什么是张量
张量(Tensor)是 PyTorch 里最核心的数据结构,可以把它理解成一种多维数组:0 维是标量,1 维是向量(Vector),2 维是矩阵(Matrix),更高维也都可以继续表示。
- 和 NumPy 很像:基础用法接近 NumPy 数组。
- 能力更强:可以通过 CUDA 放到 GPU 上加速。
张量的维度图解
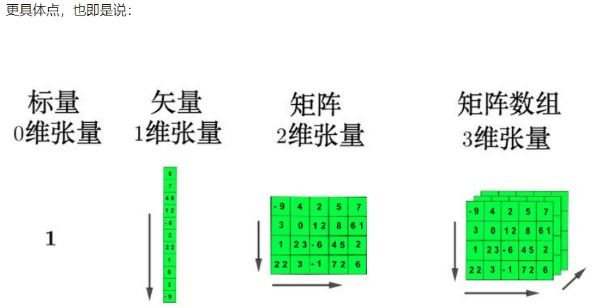
多个二维张量组成三维张量
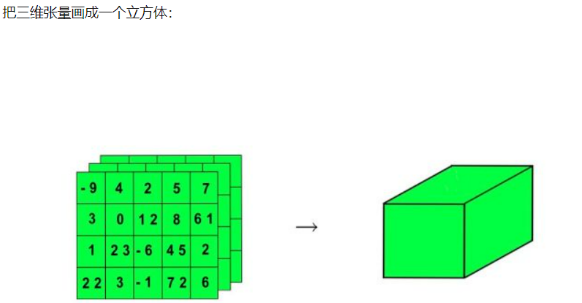
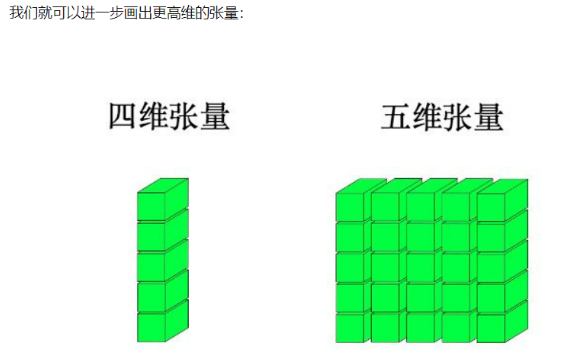
多个三维张量组成四维张量
多个四维张量组成五维张量
张量创建
#掌握:
	torch.tensor        # 根据现有数据创建张量
	torch.rand          # 创建 [0, 1) 均匀分布的随机张量
	torch.randint       # 创建指定范围的随机整数张量
	torch.manual_seed   # 设置随机种子(确保结果可复现)
	torch.zeros         # 创建全 0 张量
	torch.ones          # 创建全 1 张量
	torch.type          # 查看或转换张量的数据类型
基本创建方式
- 在 torch 中 CPU 和 GPU 张量分别有 8 种数据类型:
数据类型 dtype CPU tensor GPU tensor 32位浮点型 torch.float32/torch.floattorch.FloatTensortorch.cuda.FloatTensor64位浮点型 torch.float64/torch.doubletorch.DoubleTensortorch.cuda.DoubleTensor16位浮点型 torch.float16/torch.halftorch.HalfTensortorch.cuda.HalfTensor8位无符号整型 torch.uint8torch.ByteTensortorch.cuda.ByteTensor8位有符号整型 torch.int8torch.CharTensortorch.cuda.CharTensor16位有符号整型 torch.int16/torch.shorttorch.ShortTensortorch.cuda.ShortTensor32位有符号整型 torch.int32/torch.inttorch.IntTensortorch.cuda.IntTensor64位有符号整型 torch.int64/torch.longtorch.LongTensortorch.cuda.LongTensor- 张量中默认的数据类型是float32(torch.FloatTensor)
PyTorch安装:
pip install torch -i https://pypi.tuna.tsinghua.edu.cn/simple
torch.tensor(data=, dtype=)根据指定数据创建张量
  import torch  # 需要安装torch模块
  import numpy as np

  # 1. 创建张量标量
  data = torch.tensor(10)
  print(data)

  # 2. numpy 数组, 由于data为float64, 张量元素类型也是float64
  data = np.random.randn(2, 3)
  print(data,data.dtype)
  data = torch.tensor(data)
  print(data,data.dtype)

  # 3. 传递容器数据类型
  # 整数默认是int64
  data = torch.tensor([11,22,33])
  print(data,data.dtype)

  # 浮点数默认是float32
  data = torch.tensor([1.1, 2.2, 3.3])
  print(data,data.dtype)
torch.Tensor(size=)根据形状创建张量, 其也可用来创建指定数据的张量
  # 创建2行3列的张量。元素类型默认是float32
  data_1 = torch.Tensor(2,3)
  print(data_1,data_1.dtype)

  # 注意:如果传递一个标量进去,实际是创建一个长度为5的向量
  data_1 = torch.Tensor(5)
  print(data_1, data_1.dtype)

  # 如果传递列表, 则创建包含指定元素的张量
  data_1 = torch.Tensor([5])
  print(data_1, data_1.dtype)

  data_1 = torch.Tensor([10, 20])
  print(data_1)
torch.IntTensor()/torch.FloatTensor()创建指定类型的张量
  # 1. 创建2行3列,dtype 为 int32 的张量
  data_2 = torch.IntTensor(2,3)
  print(data_2,data_2.dtype)

  # 2. 可以通过传递列表,指定张量具体元素
  data_2 = torch.IntTensor([11,22,33])
  print(data_2, data_2.dtype)

  # 3. 注意:创建张量时,如果传递的元素值类型与张量类型不匹配,会自动进行类型转换(向下取整)
  data_2 = torch.IntTensor([11.1, 22.5, 33.9])
  print(data_2)

  # 4. 其他的类型
  data = torch.ShortTensor()  # int16
  print(data_2)
  data = torch.LongTensor()   # int64
  print(data_2)
  data = torch.FloatTensor()  # float32
  print(data_2)
  data = torch.DoubleTensor() # float64
  print(data_2)
线性和随机张量
线性张量:通俗来说,就是生成一个等差数列。你可以把它想象成爬楼梯,要么规定好每一步迈多大(固定步长),要么规定好一共走几步(固定数量),系统会自动把中间的台阶按等比例铺好。
左闭右开 是左侧的数包含,右侧的数不包含
-
torch.arange(start=, end=, step=):固定步长线性张量 -
torch.linspace(start=, end=, steps=):固定元素数量线性张量
  # arange区间是[start,end)左闭右开
  data_3 = torch.arange(start=1,end=10,step=2)
  print(data_3,data_3.dtype)

  # 生成一维张量。linspace区间是[start,end]左右都是闭区间。注意steps不表示步长,表示生成的元素个数
  data_3 = torch.linspace(start=1,end=10,steps=6)
  print(data_3)
torch.randn/rand(size=)创建随机浮点类型张量torch.randint(low=, high=, size=)创建随机整数类型张量 左闭右开torch.initial_seed()和torch.manual_seed(seed=)随机种子设置
  # 创建2行3列的随机值张量。元素值区间在[0,1)之间
  data_3 = torch.rand(2,3)
  print(data_3)

  # 创建2行3列的随机值张量。元素值符合标准正态分布
  data_3 = torch.randn(2,3)
  print(data_3)

  # 创建随机整数张量:
  # - low=1, high=10:取值范围是 [1, 10),即包含 1 但不包含 10(左闭右开)
  # - size=(2, 3):指定张量形状为 2 行 3 列
  data_3 = torch.randint(low=1,high=10,size=(2,3))
  print(data_3)

  # 查看随机数种子
  seed = torch.initial_seed()
  print(seed)

  # 手动设置随机数种子
  # 设置以后,生成的随机数将会固定
  torch.manual_seed(4)
  data_3 = torch.randn(2,3)
  print(data_3)
指定值张量
- torch.zeros(size=) 和 torch.zeros_like(input=) 创建全0张量
  # 1. 创建指定形状2行3列,值全0张量
  data = torch.zeros(2, 3)
  print(data)

  # 2. 根据张量形状创建全0张量
  data = torch.zeros_like(data)
  print(data)
torch.ones(size=)和torch.ones_like(input=)创建全1张量
  # 1. 创建指定形状全1张量
  data = torch.ones(2, 3)
  print(data)

  # 2. 根据张量形状创建全1张量
  data = torch.ones_like(data)
  print(data)
torch.full(size=, fill_value=)和torch.full_like(input=, fill_value=)创建全为指定值张量
  # 创建全为指定值张量
  data_4 = torch.full(size=(2,3),fill_value=99)
  print(data_4)

  # 根据张量形状创建指定值的张量
  data_5 = torch.full_like(data_4, 20)
  print(data_5)
指定元素类型张量
data.type(dtype=)
  data = torch.full(size=(2,3),fill_value=10)
  print(data, data.dtype) #torch.int64

  # 神经网络中要求的数据类型就是float32
  data_1 = data.type(torch.float32)
  print(data_1, data_1.dtype) #torch.float32

  # 转换为其他类型
  data_1 = data.type(torch.float64)
  print(data_1)

  # 还有其他的写法
  data_1 = data.type(torch.FloatTensor)
  print(data_1)

  data_1 = data.type(torch.DoubleTensor)
  print(data_1)
  # data = data.type(torch.ShortTensor)
  # data = data.type(torch.IntTensor)
  # data = data.type(torch.LongTensor)
  # data = data.type(torch.FloatTensor)
  # data = data.type(dtype=torch.float16)
data.half/float/double/short/int/long()
  data = torch.full(size=(2,3),fill_value=10)
  print(data, data.dtype)

  # float16
  data_1 = data.half()
  print(data_1)

  # float64
  data_1 = data.double()
  print(data_1)

  # int16
  data_1 = data.short()
  print(data_1)
张量类型转换
张量转换为NumPy数组
- 使用
t.numpy()函数可以将张量转换为 ndarray 数组,但是共享内存,可以使用copy函数避免共享。
  import torch
  import numpy as np

  # 张量 转 numpy的ndarray
  t_1 = torch.tensor([11,22,33])
  print(t_1, type(t_1))

  # 共享内存
  arr_1 = t_1.numpy()
  print(arr_1, type(arr_1))

  # 可以在后面使用copy(),不共享内存
  arr_2 = t_1.numpy().copy()
  print(arr_2, type(arr_2))

  t_1[0] = 100
  print(f"t_1={t_1},arr_1={arr_1},arr_2={arr_2}")
NumPy数组转换为张量
- 使用
torch.from_numpy(ndarray=)可以将ndarray数组转换为 tensor张量,默认共享内存,使用copy函数避免共享。 - 使用
torch.tensor(data=)可以将ndarray数组转换为tensor张量,默认不共享内存。
  # numpy的ndarray 转 张量
  arr = np.array([11,22,33])
  print(arr,type(arr))

  # 共享变量
  t_1 = torch.from_numpy(arr)
  print(t_1, type(t_1))

  # 不共享变量
  t_2 = torch.tensor(arr)
  print(t_2, type(t_2))

  arr[0] = 99
  print(f"arr={arr},t_1={t_1},t_2={t_2}")
提取标量张量的数值
- 对于只有一个元素的张量,使用
item()函数将该值从张量中提取出来
  # 标量 和 张量 互转
  # 1- 标量 转 张量
  # t_1 = torch.tensor(24)
  t_1 = torch.tensor([24])
  print(t_1, type(t_1))


  # 2- 张量 转 标量
  value = t_1.item()
  print(value, type(value))

  # 注意:张量中只有一个值的时候才能够使用item()
  t_2 = torch.tensor([11,22])
  print(t_2)

  values = t_2.item()
  # 会报错 : RuntimeError: a Tensor with 2 elements cannot be converted to Scalar
  print(values)
张量数值计算
掌握:+ - * / @
基本运算
加减乘除取负号:
-
+、-、*、/、- -
add(other=)、sub、mul、div、neg -
add_(other=)、sub_、mul_、div_、neg_(其中带下划线的版本会修改原数据)
  import torch

  # 1---- 基本运算 ----
  t1 = torch.tensor([[1,2,3],[4,5,6]])
  print(t1)

  # 张量 和 数值运算,张量中每个元素都会和该数值进行运算
  t2 = t1 + 10
  print(t2)

  t3 = t1 * 10
  print(t3)

  # 运算函数
  # 不带下划线的函数,不会修改源数据
  # 下面的两种调用方式都行
  # t4 = torch.add(t3,10)
  t4 = t3.add(10)
  print(t3, "\n", t4)

  # 带下划线的函数,会修改源数据
  # 同时注意调用方式。只能这么调用
  t5 = t3.add_(10)
  print(t3, "\n", t5)

  # neg()、neg_()取反函数。正数变负数,负数变正数
  t1 = torch.tensor([[1, -2, 3], [4, -5, -6]])
  print(t1)

  # 不会修改源数据
  t2 = t1.neg()
  print(t1, "\n", t2)

  # 会修改源数据
  t3 = t1.neg_()
  print(t1, "\n", t3)

  # 其他函数
  t1 = torch.tensor([[1, -2, 3], [4, -5, -6]])
  print(t1.sub(100)) # 减法
  print(t1.mul(100)) # 乘法
  print(t1.div(100)) # 除法
点乘运算
点乘(Hadamard 积)也称为元素级乘积,指的是相同形状的张量对应位置的元素相乘,使用
mul或运算符*实现。例如:
$$ A = \begin{bmatrix} 1 & 2 \\\\ 3 & 4 \end{bmatrix}, B = \begin{bmatrix} 5 & 6 \\\\ 7 & 8 \end{bmatrix} $$则 $A, B$ 的 Hadamard 积为:
$$ A \circ B = \begin{bmatrix} 1 \times 5 & 2 \times 6 \\\\ 3 \times 7 & 4 \times 8 \end{bmatrix} = \begin{bmatrix} 5 & 12 \\\\ 21 & 32 \end{bmatrix} $$
# 定义张量.   3行2列
t1 = torch.tensor([[1, 2], [3, 4], [5, 6]])

# 定义张量.   3行2列
t2 = torch.tensor([[7, 8], [9, 10], [11, 12]])
# t2 = torch.tensor([[7, 8], [9, 10]])
print(f't1: {t1},\n t2: {t2}')


# 点乘
# 要求:两个张量的形状要相同,
#否则报错(RuntimeError: The size of tensor a (2) must match the size of tensor b (3) at non-singleton dimension 0)
# 结果:对应位置元素相乘
t3 = t1 * t2
print(t3)

# 点乘函数mul,推荐直接用*
t4 = t1.mul(t2)
print(t4)
矩阵乘法运算
矩阵乘法运算要求第一个矩阵 shape: (n, m),第二个矩阵 shape: (m, p), 两个矩阵点积运算 shape 为: (n, p)。
使用matmul或运算符@实现。
4×3 + 4×3 + 1×2 = 12+12+2
4×1 + 4×3 + 1×2 = 4+12+2
4×2 + 4×2 + 1×2 = 8+8+2
4×3 + 4×2 + 1×2 = 12+8+2
3×3 + 1×3 + 3×2 = 9+3+6
3×1 + 1×3 + 3×2 = 3+3+6
3×2 + 1×2 + 3×2 = 6+2+6
3×3 + 1×2 + 3×2 = 9+2+6
结果矩阵维度:m行 × n列 乘 n行 × k列 = m行 × k列
- 运算符
@用于进行两个矩阵的乘积运算 torch.matmul(input=, other=)
  # 3---------------- 张量的矩阵乘法 ----------------
  """
      矩阵乘法的总结:
          注意: 前一个矩阵的列数与后一个矩阵的行数,必须相同
  """

  torch.manual_seed(129)
  A = torch.randint(low=1, high=5, size=(2,3))    # 2行3列
  B = torch.randint(low=1, high=5, size=(3,4))    # 3行4列

  # 下面B的行与A的列不等,因此会报错
  # B = torch.randint(low=1, high=5, size=(2,4))    # 2行4列

  print(f"A-->{A}")
  print(f"B-->{B}")

  result_2 = A @ B    # 推荐掌握
  # result_2 = A.matmul(B)

  print(f"结果: {result_2}")
张量运算函数
-
tensor.mean(dim=):平均值 -
tensor.sum(dim=):求和。掌握 -
tensor.min/max(dim=):最小值/最大值 -
tensor.pow(exponent=):幂次方 $x^n$ -
tensor.sqrt():平方根 -
tensor.exp():指数 $e^x$ -
tensor.log():对数 以e为底
  import torch

  # 定义张量, 浮点型.
  t1 = torch.tensor([[1, 2, 3], [4, 5, 6]], dtype=torch.float)

  print(t1, t1.shape)

  # 1- sum求和
  # dim=0,按列求和
  r1 = t1.sum(dim=0)
  print(r1)

  # dim=1,按行求和
  r2 = t1.sum(dim=1)
  print(r2)

  # dim不设置值,对所有元素求和
  r3 = t1.sum()
  print(r3)


  # 2- 均值,元素数据类型必须是float,不能是整数
  t1 = torch.tensor([[1, 2, 3], [4, 5, 6]],dtype=torch.float32)
  # t1 = torch.tensor([[1, 2, 3], [4, 5, 6]],dtype=torch.int32)

  # r1 = t1.mean(dim=0)
  r1 = t1.mean(dim=1)
  print(r1)


  # 3- 平方/立方/平方根/e的n次幂/对数
  t1 = torch.tensor([[1, 2, 3], [4, 5, 6]], dtype=torch.float)

  print(t1.pow(2)) # 平方
  print(t1.pow(3)) # 立方
  print(t1.sqrt()) # 开根号
  print(t1.exp()) # e的n次幂,元素作为幂使用
  print(t1.log()) # 以e为底求对数
  print(t1.log2()) # 以2为底的对数
  print(t1.log10()) # 以10为底的对数
  print(torch.log(t1) / torch.log(torch.tensor(3))) # 以3为底的对数(了解)
:dim 与 keepdim
- dim 表示按哪个维度聚合;支持负索引,-1 表示最后一个维度
- dim 可为元组,一次性对多个维度求和
- keepdim=True 会保留被聚合维度(形状变为 1),便于后续广播运算
- dim=0按第0维(也就是行)计算,dim=1按第1维(也就是列)计算 (此说法仅适用2维张量)
多维张量计算原理示例
import torch

# ==================================================
# 1. 3维张量测试:形状 (2, 3, 4)
# 维度索引对应:
#   dim=0  → 第1个维度,大小为 2(最外层)
#   dim=1  → 第2个维度,大小为 3(中间层)
#   dim=2  → 第3个维度,大小为 4(最内层)
#   dim=-1 → 最后一个维度,等价于 dim=2
# ==================================================
print("=" * 50)
print("【3维张量测试】原始形状: (2, 3, 4)")
print("=" * 50)

# 使用 arange 生成 0~23 的连续整数(共 2*3*4=24 个数)
# 再用 reshape 塑造成 (2, 3, 4) 的形状
# 用连续数字的好处:方便你手动核对求和结果,直观看到维度变化
t3 = torch.arange(2 * 3 * 4).reshape(2, 3, 4)

print("原始张量内容:")
print(t3)
print(f"\n原始张量形状: {tuple(t3.shape)}")
print()

# 逐个维度执行 sum 聚合操作
# 核心规律:指定哪个 dim,运算后就会把该维度「压缩消失」
dim_list = [0, 1, 2, -1]
for d in dim_list:
    # 按维度 d 求和:该维度上的所有元素被加在一起,维度本身消失
    res = t3.sum(dim=d)

    # 打印结果
    print(f"▶ sum(dim={d})")
    print(f"  结果形状: {tuple(res.shape)}")
    print(res)
    print("-" * 30)
"""
# ==================================================
# 2. 4维张量测试:形状 (2, 3, 4, 5)
# 维度索引对应:
#   dim=0  → 第1维,大小 2
#   dim=1  → 第2维,大小 3
#   dim=2  → 第3维,大小 4
#   dim=3  → 第4维,大小 5
#   dim=-1 → 倒数第1维 = dim=3
#   dim=-2 → 倒数第2维 = dim=2
#   dim=-3 → 倒数第3维 = dim=1
# ==================================================
print("\n" + "=" * 50)
print("【4维张量测试】原始形状: (2, 3, 4, 5)")
print("=" * 50)

# 生成 0~119 的连续整数(共 2*3*4*5=120 个数),塑造成 4 维
t4 = torch.arange(2 * 3 * 4 * 5).reshape(2, 3, 4, 5)

print(f"原始张量形状: {tuple(t4.shape)}")
print(t4)
print("="*23)
# 测试正索引和负索引
res = t4.sum(dim=1)

# 直观展示:原始形状去掉对应位置的数字,就是结果形状
print(f"结果形状: {tuple(res.shape)}")
print(res)

print("\n💡 核心结论:")
print("  1. 维度编号从 0 开始,shape 元组的第几个位置,就是第几维")
print("  2. 聚合操作(sum/mean/max等)会「消掉」指定的那个维度")
print("  3. dim=-n 表示从后往前数第 n 个维度,dim=-1 永远是最后一维")

"""
三维张量原理图
2. 负索引从后往前数:
dim=-1 = 最后一维,dim=-2 = 倒数第二维3. 对于 shape=(2,3,4):
- sum(dim=0) → shape=(3,4)
- sum(dim=1) → shape=(2,4)
- sum(dim=2) → shape=(2,3)
- sum() 不指定dim → 全部元素求和,得到标量
import torch

t = torch.tensor([[1, 2, 3],
                  [4, 5, 6]], dtype=torch.float32)
print(t, t.shape)            # torch.Size([2, 3])

# 1) 单维聚合
print(t.sum(dim=0))          # 按列求和 -> [5., 7., 9.]
print(t.sum(dim=1))          # 按行求和 -> [6., 15.]
print(t.sum(dim=-1))         # 等价于 dim=1(最后一维)

# 2) 多维聚合(元组)
print(t.sum(dim=(0, 1)))     # 对 0、1 两个维度同时聚合,等价于 t.sum()

# 3) 保留维度
print(t.sum(dim=1, keepdim=True).shape)  # torch.Size([2, 1])
print(t.sum(dim=0, keepdim=True).shape)  # torch.Size([1, 3])
张量索引操作
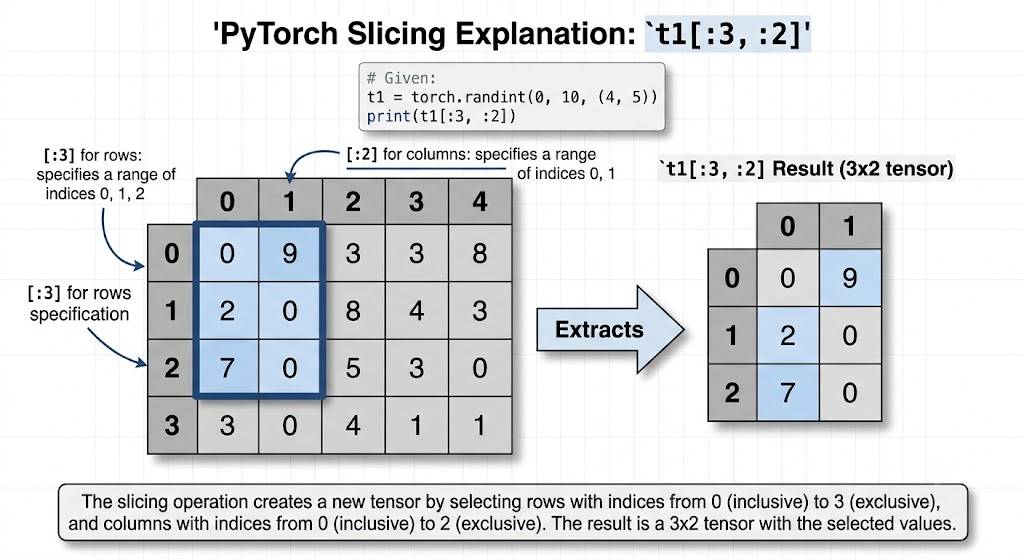
掌握:范围索引
我们在操作张量时,经常需要去获取某些元素就进行处理或者修改操作,在这里我们需要了解在torch中的索引操作。
原理图
import torch

# 设置随机种子
torch.manual_seed(4)

# 创建张量
t1 = torch.randint(1, 10, (4,5))
print(t1)

# 1---- 行列索引 ----
print(t1[0]) # 获取第一行
print("-"*30)
print(t1[:, 0]) # 获取第一列
print("-"*30)
print(t1[2,4]) # 获取 第3行和第5列限定的内容

# 2---- 列表索引 ----
# 需求1: 返回(0, 1), (1, 2)两个位置的元素
# [0,1]第0行、第1行
# [1,2]第1列、第2列
print(t1[[0,1], [1,2]])
print("-"*30)

# 需求2: 返回(0, 3), (2,4)两个位置的元素.
print(t1[[0,2], [3,4]])
print("-"*30)

# 需求3: 获取第0行的 第3列和第4列; 第2行的 第3列和第4列
# 共计: 4个元素
print(t1[[[0], [2]], [3,4]])

# 3---- 范围索引 ----
# 含头不含尾
# 需求1: 前3行, 前2列
print(t1[:3, :2])

# 需求2: 第2行到最后, 前2列
print(t1[2:, :2])

# 4---- 布尔索引 ----
# 需求1: 第3列中值大于等于5,对应行数据
print(t1[:, 2]>=5)
print("-"*30)

print(t1[torch.tensor([True, True, False, True])])
print("-"*30)

print(t1[t1[:, 2]>=5])

# 需求2: 第2行中值大于等于5,对应列数据
print(t1[2]>=5)
print("-"*30)

print(t1[:,torch.tensor([ True,  True, False,  True,  True])])
print("-"*30)

print(t1[:,t1[2]>=5])

# 5---- 多维索引 ----
t2 = torch.randint(1, 10, (3, 4, 5))
print(t2)
print("-"*30)

# 获取0轴上的第1个数据.
print(t2[0, :, :])
print("-"*30)

# 获取1轴上的第1个数据.
print(t2[:, 0, :])
print("-"*30)

# 获取2轴上的第1个数据.
print(t2[:, :, 0])张量形状操作*
掌握:
	reshape     # 重新调整张量形状,不改变元素总数
	squeeze     # 删除长度为 1 的维度,常用于降维
	unsqueeze   # 在指定位置增加长度为 1 的维度,常用于升维
	transpose   # 交换两个维度的位置
	permute     # 按指定顺序重排多个维度
张量形状操作是指对张量的维度进行变换的一系列操作。
张量的形状则描述了每个维度上的元素数量。
reshape
保证张量数据个数不变的前提下改变维度
import torch

data = torch.tensor([[10, 20, 30], [40, 50, 60]])
# 1. 使用 shape 属性或者 size 方法都可以获得张量的形状
print(data.shape, data.shape[0], data.shape[1])
print(data.size(), data.size(0), data.size(1)) # 效果同上

# 2. 使用 reshape 函数修改张量形状
# reshape(1, 6) 表示重塑成 1 行 6 列
# 参数含义:
#   1 表示第 0 维长度为 1,也就是 1 行
#   6 表示第 1 维长度为 6,也就是 6 列
new_data = data.reshape(1, 6)
print(new_data, new_data.shape)
# 输出:
# tensor([[10, 20, 30, 40, 50, 60]]) torch.Size([1, 6])

# reshape(1, -1) 表示第一维固定为 1,第二维让 PyTorch 自动推导
# 参数含义:
#   1 仍然表示重塑后有 1 行
#   -1 表示这一维不用手动写,系统会根据元素总数自动算出是 6 列
new_data = data.reshape(1, -1)
print(new_data, new_data.shape)
# 输出:
# tensor([[10, 20, 30, 40, 50, 60]]) torch.Size([1, 6])
reshape(*shape):按给定的新形状返回张量,前提是前后元素总数必须一致reshape(1, 6):手动指定新形状是1行6列reshape(1, -1):只固定前面的1,后面的-1交给 PyTorch 自动计算- 这里原张量一共有
2 × 3 = 6个元素,所以-1最终会被推导成6
squeeze和unsqueeze
squeeze:删除指定位置形状为1的维度,不指定位置则删除所有形状为1的维度,降维
unsqueeze:在指定位置添加形状为1的维度,升维
import torch

# squeeze和unsqueeze
# 定义张量, 5个元素
t1 = torch.tensor([1, 2, 3, 4, 5])
print(t1,t1.shape)

# unsqueeze增加形状为1的维度
t2 = t1.unsqueeze(dim=0) # 1行5列
print(t2,t2.shape)
print("-"*30)

t3 = t1.unsqueeze(dim=1) # 5行1列
print(t3,t3.shape)

# squeeze删除所有形状为1的维度
t4 = t3.squeeze()
print(t4,t4.shape)

# 重新定义多维, 且包含1的维度.
t5 = torch.randint(1, 10, (2, 1, 3, 1, 5))
print(t5,t5.shape)

# 不设置参数,表示删除所有为1的维度
t6 = t5.squeeze() # 形状[2, 3, 5]
print(t6, t6.shape)
print("-"*30)

# 可以通过dim精准删除哪个轴上的1的维度
t7 = t5.squeeze(dim=1) # 形状[2, 3, 1, 5]
print(t7, t7.shape)
transpose和permute
transpose:实现交换张量形状的指定维度, 例如: 一个张量的形状为 (2, 3, 4) ,把 3 和 4 进行交换, 将张量的形状变为 (2, 4, 3)
permute:一次交换更多的维度
t1 = torch.randint(1,10,(2,3,5))
print(t1, t1.shape)

# 需求1: 交换0轴 和 1轴.  (2, 3, 5) -> (3, 2, 5)
"""
    transpose(参数1,参数2):注意每次只能交换两个维度的位置
        参数1、参数2 表示的是要交换哪几个轴的位置。参数传递顺序无所谓
"""
# 下面两个写法效果一样
# t2 = t1.transpose(dim0=1,dim1=0)
t2 = t1.transpose(dim0=0,dim1=1)
print(t2, t2.shape)
print("-"*30)


# 需求2: 从 (2, 3, 5) -> (5, 2, 3)
"""
    permute(dims):同一时刻可以交换多个维度的位置。参数中传递的是维度顺序
"""
t3 = t1.permute(dims=[2,0,1])
print(t3, t3.shape)
张量拼接操作
张量拼接操作用于组合来自不同来源或经过不同处理的数据。
cat/concat
torch.cat 和 torch.concat 没有区别。torch.concat 只是 torch.cat 的别名(兼容命名),参数、拼接规则、运行结果完全相同。
沿着现有维度连接一系列张量。所有输入张量除了指定的拼接维度外,其他维度必须一样。
"""
    cat:
        1- 不能修改张量的维度个数。例如:不能将2维变3维
        2- 除了拼接的维度以外,其他维度必须相同
"""
t1 = torch.randint(1,10,size=(2,3))
t2 = torch.randint(1,10,size=(2,3))
print(t1,t1.shape)
print(t2,t2.shape)


cat_1 = torch.cat([t1,t2],dim=0)
print(cat_1,cat_1.shape)

cat_2 = torch.cat([t1,t2],dim=1)
print(cat_2,cat_2.shape)


# 不能将2维变3维
# torch.cat([t1,t2],dim=2)


t1 = torch.randint(1,10,size=(2,3))
# 除了拼接的维度以外,其他维度必须相同
t2 = torch.randint(1,10,size=(5,3))
# t2 = torch.randint(1,10,size=(2,4))
print(t1,t1.shape)
print(t2,t2.shape)

cat_1 = torch.cat([t1,t2],dim=0)
print(cat_1,cat_1.shape)
stack
在一个新的维度上连接一系列张量,这会增加一个新维度,并且所有输入张量的形状必须完全相同。
import torch

"""
    stack:
        1- 两个拼接的张量形状必须完全一样
        2- 会产生新维度,在新维度上进行拼接操作
"""
t1 = torch.randint(1,10,size=(5,6))
t2 = torch.randint(1,10,size=(5,6))
print(t1,t1.shape)
print(t2,t2.shape)

stack_1 = torch.stack([t1,t2],dim=0)
print(stack_1,stack_1.shape) # [2,5,6]

stack_2 = torch.stack([t1,t2],dim=1)
print(stack_2.shape) # [5,2,6]

stack_3 = torch.stack([t1,t2],dim=2)
print(stack_3.shape) # [5,6,2]
stack扩展
torch.stack 的核心意义在于 创建新维度来保留多个独立张量的层次结构关系,而 torch.cat 仅能扩展现有维度。当输入张量形状完全相同时,两者结果的维度数量和语义含义完全不同,这是 stack 不可替代的关键原因。
一、核心区别
1. 维度变化的本质差异
torch.cat:
在现有维度上拼接,不新增维度。例如两个形状为(3,)的张量:
torch.cat([a, b], dim=0)→ 结果形状为(6,)(6个独立元素,无分组信息)。torch.stack:
在新维度上堆叠,强制新增一个维度。例如相同输入:
torch.stack([a, b], dim=0)→ 结果形状为(2, 3)(2组,每组3个元素,保留分组结构)。
2. 输入要求的关键差异
torch.cat只要求非拼接维度一致(例如拼接行时列数需相同)。torch.stack要求所有维度必须完全相同,且必须新增一个维度来标识“这是多个独立张量的集合”。
二、stack 的不可替代场景
1. 保留序列/批次的层次信息
- 典型场景:处理时间序列或批次数据时,需明确区分“时间步”或“样本”维度。
- 例如:RNN 每一步输出形状为
(batch_size, hidden_dim),若直接cat拼接:
torch.cat(outputs, dim=0)→ 形状(seq_len * batch_size, hidden_dim),丢失时间步顺序。 - 正确做法:
torch.stack(outputs, dim=0)→ 形状(seq_len, batch_size, hidden_dim),保留时间步维度。
- 例如:RNN 每一步输出形状为
2. 构建多维数据结构
- 图像批次处理:
单张图像形状为(C, H, W),10 张图像需构建成批次:
torch.stack(images, dim=0)→ 形状(10, C, H, W)(新增batch_size维度)。
若用cat:torch.cat(images, dim=0)→ 形状(10*C, H, W),通道信息被破坏。
3. 避免维度混淆
- 关键区别:
stack的结果中,新维度明确标识了“这是多个独立张量”,而cat会将所有数据视为同一维度的连续元素。- 例如两个向量
和:stack→[, ](2个独立向量)。cat→ ``(1个长向量,原始分组信息丢失)。
- 例如两个向量
三、简单总结
- 用
cat:当只需扩展现有维度(如拼接特征、合并行/列数据)。 - 用
stack:当需要明确保留多个张量的独立性(如构建批次、时间序列、多模态对齐)。
本质:stack 不是拼接数据,而是为数据添加一个“容器维度”,确保后续操作能区分原始输入的边界。若强行用 cat 替代,会导致维度语义错误或关键结构信息丢失。